
(Now a bi-weekly program)
January 22, 2013
Join the "CWTD Yahoo Group" for
email discussion in between our weekly sessions by clicking
here.
Arduino Design Tactics
Overview
Okay, so who hasn't heard of the Arduino in the last couple of
years? It's actually been pretty hard to avoid. But have you given it a try yet
for a project on the bench? Perhaps a VFO controller, or maybe a dedicated
voltmeter, antenna rotor controller, code practice oscillator ... the list goes
on! The Arduino is designed for use by non-techie users: artists to add lights
and sound to their works, musicians to add new dimensions to their instruments,
hobbyists building robots and R/C vehicles, homeowners to make custom home
automation, and tinkerers to make unique alarm systems. The functional modules
are simple to use and require only basic electronic and software skills.
We'll be overviewing the different types of Arduinos, the interfaces and the
various canned software modules available for it ... and per usual, provide a
refined and carefully-crafted set of references to assist you in your Arduino
homebrewing adventures!
73, George N2APB & Joe N2CX
Audio Recording
... (Listen
to the MP3 podcast)
Discussion
Notes:
<20:00:52> "Ray K2ULR": If AD7BP (Bob) joins, he
has done an Arduino project.
<20:12:54> "Todd K7TFC": Here's a YouTube link to a TED Talk presentation by
Massimo Banzi, one of the developers: "How Arduino is open-sourcing
imagination."
<20:13:26> "Todd K7TFC": Sorry:
http://www.youtube.com/watch?v=UoBUXOOdLXY
<20:18:15> "Alan W2AEW": Really nice video playlist on Arduinos - starting from
scratch:
http://www.youtube.com/watch?v=fCxzA9_kg6s&list=ECA567CE235D39FA84
<20:18:34> "John - NG0R (Mac)": The genius of the arduino platform is the low
barrier to entry; low cost, cross platform tools, simple language, showing up in
stores and online
<20:19:49> "George - N2APB": Ahhhh, LOW COST ... a big point that I neglected to
mention. Thanks John.
<20:20:56> "Dan KB9JLO": Great tutorial site:
http://tronixstuff.wordpress.com/tutorials/
<20:23:33> "Mike WA8BXN": do any of them have a network port?
<20:23:51> "John - NG0R (Mac)": you can get a network shield
<20:23:54> "Alan W2AEW": You can get an Ethernet shield for them
<20:24:04> "Terry WB4JFI": I've used wired ethernet some - works great.
<20:24:21> "Terry WB4JFI": Wifi shields are more of a pain.
<20:24:40> "Terry WB4JFI": Sparkfun is another great source for Arduino boards
and shields
<20:30:56> "Frank N3PUU": I like the RBBB and BBB kits from moderndevice for
breadboard prototyping with arduino (http://shop.moderndevice.com/collections/arduino-freeduino/)
<20:32:39> "Dan KB9JLO": I'm working on a larger LCD screen plus encoder, keypad
for FT-817
<20:35:35> "Alan W2AEW": I already emailed it to you, George
<20:39:23> "Alan W2AEW": Here's a picture of my XY callsign:
http://www.qsl.net/w2aew//image001.jpg
<20:42:34> "Joe N2CX": WSPR = Weak Signal Propagation Reporter, I think
<20:43:07> "Rick K3IND": Can you recommend an online or printed guide to
learning C specifically for the Arduino?
<20:43:52> "Alan W2AEW": user anonymous is on vox causing echo
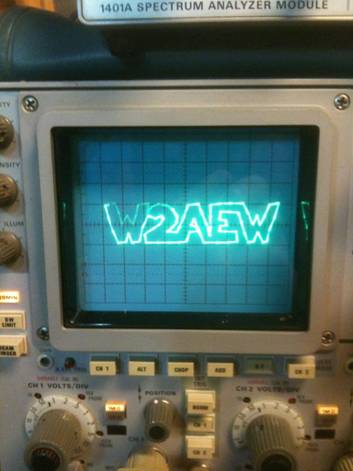
<20:43:53> "Todd K7TFC": Alan W2AEW: Very cool scope screen!
<20:44:38> "Alan W2AEW": Rick - the Arduino Cookbook is a good language tutorial
<20:45:40> "Alan W2AEW": Thank you Todd!
<20:48:00> "Sam NV1P": I wonder if it would be possible to implement being able
to display a call sign (or any text) using the scopes normal sweep (not XY mode)
<20:54:17> "Alan W2AEW": Sam, that would be tough because the sweep moves in one
direction. However, you could potentially do it "TV" style by scanning lines
<20:54:52> "Sam NV1P": not if your scopes blanking circuit doesn't work. hi hi
<20:55:45> "Alan W2AEW": True - and most digital scopes don't have z-axis
modulation (poo!)
<20:56:20> "Sam NV1P": I was just thinking that you could use Z axis. But that's
why all of my scopes are tube Tek (mostly 500 series)
<20:57:27> "Todd K7TFC": I inadvertently bought blank Nano cards for the
MMduinoNano by Propox (I thought they were kits). I'm looking for bootloader-programmed
ATmega328 chips (Propox doesn't have them). Any ideas?
<20:57:29> "Alan W2AEW": Of course. I used the Z-axis on a couple of videos I
did. One creating a "marker" on a scope trace. And another to display composite
video on my scope.
<20:58:46> "Terry WB4JFI": Sparkfun also sells the AtMega328 with the Arduino
bootloader. $5.50 I think
<20:59:08> "Sam NV1P":
https://www.youtube.com/watch?v=s1eNjUgaB-g ... my new goal: get an Arduino
to do this
<21:00:05> "Alan W2AEW": Limor Freid (ladyada) was voted entrepreneur of the
year 2012
http://www.entrepreneur.com/article/225213
<21:00:14> "Terry WB4JFI": Just the chip, ma'am:
https://www.sparkfun.com/products/10524
<21:00:18> "Mike KD4SGN": @Todd: Ebay #121022947118
<21:01:06> "Alan W2AEW": Sam - my composite video to scope converter circuit
video:
https://www.youtube.com/watch?v=5FYF5uhCzAM
<21:06:44> "Todd K7TFC": Thanks, Terry and Mike!!
<21:07:58> "Sam NV1P": Alan, I think I may need to send you an email.
<21:08:39> "Alan W2AEW": Sam - email is alan.wolke _at_ gmail.com
<21:11:08> "Todd K7TFC": The Sparkfun chip is the DIP version, and the one on
eBay is the SMD chip. That's the one I need, and in fact I just "bought it now."
Thanks again, guys!
<21:11:23> "Mike KD4SGN": Todd,
<21:11:35> "Mike KD4SGN": Todd, I had good luck with that one.
<21:12:13> "Todd K7TFC": Mike: Great!!
<21:12:33> "Carl w2ptz": As a real newbie in digital techniques thanks all for a
great learning experience
<21:14:37> "Alan W2AEW": George - did you see the video I did last year showing
the testing of the DDS60 that I assembled for a friend? It was before I got an
arduino - so I controlled it with a parallel port
https://www.youtube.com/watch?v=yxQOSprOo04
<21:23:09> "Bill - KD5TFD": You need a Frys!
<21:24:33> "Todd K7TFC": George, What was the name of that store, again?
<21:24:58> "N8WQ - Al": Micro Center?
<21:25:02> "Brent KD0GLS": Todd, Microcenter
<21:25:04> "Bill - KD5TFD": Think it's Micro Center:
http://www.microcenter.com/
<21:25:14> "Todd K7TFC": Thanks!!
<21:27:49> "Terry WB4JFI": Microcenter in Vienna Virginia, I MISS IT!!
<21:27:49> "Todd K7TFC": Phooey! None in Oregon!
<21:27:51> "N8WQ - Al": Columbus and Cincy
<21:28:26> "Nancy NJ8B": George...both you and Joe do a superb job with CWTD,
keep up the good work.
<21:28:29> "Ray K2ULR": Also a Micro Center in Radnor, PA
<21:29:08> "George - N2APB": Thank you Nancy! And it is SO nice to see you here
in the group. Stay warm there in WV this week :-)
<21:29:25> "Frank N3PUU": great job guys! Looking forward to seeing more on
this..
<21:29:27> "Jim N2GXJ (w2mmd.org)": Thanks George and Joe, looking forward to
your presentation Feb 6 at GCARC in SNJ! Jim
<21:29:47> "Joe N2CX": the microcenter in pa is in st davids near radnor
<21:30:16> "Brent KD0GLS": Thanks gang, I had a good first time here.
<21:30:31> "Todd K7TFC": Many thanks, Folks!!!
<21:30:43> "Mike KD4SGN": Thanks, guy, great program.
<21:30:45> "Ray K2ULR": 73
<21:31:00> "W0ANM - Chris": Thanks Joe and George.
SESSION NOTES
....
Arduino Design Tactics
So just what IS
the Arduino?
Arduino is an open-source electronics prototyping
platform based on flexible, easy-to-use hardware and software. It's
intended for artists, designers, hobbyists, and anyone interested in
creating interactive objects or environments.
Arduino can sense the environment by receiving input from a
variety of sensors and can affect its surroundings by controlling
lights, motors, and other actuators. The microcontroller on the
board is programmed using the
Arduino programming language (based on
Wiring) and the Arduino development environment (based on
Processing). Arduino projects can be stand-alone or they can
communicate with software running on a computer (e.g. Flash,
Processing, MaxMSP).
The boards can be
built by hand or
purchased
preassembled; the software can be
downloaded for free. The hardware reference designs (CAD files)
are
available under an open-source license, you are free to
adapt
them to your needs.
Arduino
Platform Overview
(For a complete overview and comparisons of boards, see the
index of Arduino
boards.
Duemilanove
...
http://arduino.cc/en/Main/arduinoBoardDuemilanove
 |
The Arduino Duemilanove ("2009") is a
microcontroller board based on the
ATmega168 (datasheet)
or ATmega328 (datasheet).
It has 14 digital input/output pins (of which 6 can be used
as PWM outputs), 6 analog inputs, a 16
MHz crystal oscillator, a USB
connection, a power jack, an ICSP header, and a reset
button. It contains everything needed to support the
microcontroller; simply connect it to a computer with a USB
cable or power it with a AC-to-DC adapter or battery to get
started."Duemilanove" means
2009 in Italian and is named after the year of its release.
Market price ... ~ $25
|
Uno
...
http://arduino.cc/en/Main/ArduinoBoardUno
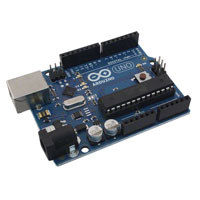 |
The Arduino Uno is a microcontroller
board based on the ATmega328 (datasheet).
It has 14 digital input/output pins (of which 6 can be used
as PWM outputs), 6 analog inputs, a 16
MHz ceramic resonator, a USB
connection, a power jack, an ICSP header, and a reset
button. It contains everything needed to support the
microcontroller; simply connect it to a computer with a USB
cable or power it with a AC-to-DC adapter or battery to get
started.The Uno differs from
all preceding boards in that it does not use the FTDI
USB-to-serial driver chip. Instead, it features the
Atmega16U2 (Atmega8U2
up to version R2) programmed as a USB-to-serial converter.
Revision 2 of the Uno board has a resistor
pulling the 8U2 HWB line to ground, making it easier to put
into
DFU mode.
Revision 3 of the board has the following new
features:
- 1.0 pinout: added SDA and SCL
pins that are near to the AREF pin and two other new
pins placed near to the RESET pin, the IOREF that allow
the shields to adapt to the voltage provided from the
board. In future, shields will be compatible both with
the board that use the AVR, which operate with 5V and
with the Arduino Due that operate with 3.3V. The second
one is a not connected pin, that is reserved for future
purposes.
- Stronger RESET circuit.
- Atmega 16U2 replace the 8U2.
"Uno" means one in Italian and was
named to mark the release of Arduino 1.0. The Uno
is one in a series of USB Arduino
boards, and the reference model for the Arduino platform.
Market price ... ~ $25 |
Uno Spec Summary
| Microcontroller |
ATmega328 |
| Operating Voltage |
5V |
| Input Voltage (recommended) |
7-12V |
| Input Voltage (limits) |
6-20V |
| Digital I/O Pins |
14 (of which 6 provide PWM output) |
| Analog Input Pins |
6 |
| DC Current per I/O Pin |
40 mA |
| DC Current for 3.3V Pin |
50 mA |
| Flash Memory |
32 KB (ATmega328)
of which 0.5 KB used by bootloader |
| SRAM |
2 KB (ATmega328) |
| EEPROM |
1 KB (ATmega328) |
| Clock Speed |
16 MHz |
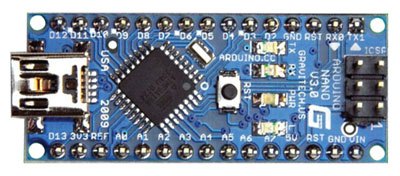
Nano...
http://arduino.cc/en/Main/ArduinoBoardNano
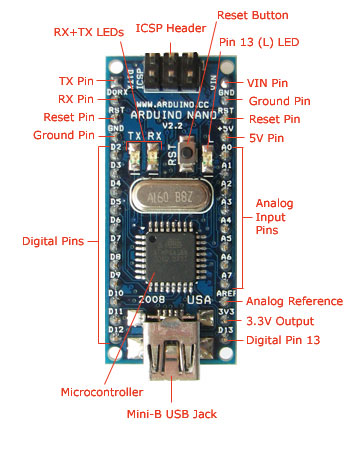 |
The Arduino Nano is a small, complete, and
breadboard-friendly board based on the ATmega328
(Arduino Nano 3.0) or ATmega168 (Arduino
Nano 2.x). It has more or less the same functionality of the Arduino
Duemilanove, but in a different package. It lacks only a DC power jack,
and works with a Mini-B USB cable instead of a standard one. The Nano
was designed and is being produced by Gravitech.
Power:
The Arduino Nano can be powered via
the Mini-B USB connection, 6-20V unregulated external power
supply (pin 30), or 5V regulated external power supply (pin
27). The power source is automatically selected to the
highest voltage source.
The FTDI
FT232RL chip on the Nano is only powered if the board
is being powered over USB. As a result, when running on
external (non-USB) power, the 3.3V output (which is supplied
by the FTDI chip) is not available and the RX and TX
LEDs will flicker if digital
pins 0 or 1 are high.
Memory
The ATmega168
has 16 KB of flash memory for storing code (of which 2 KB is
used for the bootloader); the
ATmega328 has 32 KB, (also with 2 KB used for the
bootloader). The ATmega168 has
1 KB of SRAM and 512 bytes of EEPROM (which can be read and
written with the
EEPROM library); the ATmega328
has 2 KB of SRAM and 1 KB of EEPROM.
Market price ... ~ $30 |
Bare Bones
"Pre-Programmed" Arduino Chip
... http://www.adafruit.com/products/123
 |
Want to make the least-expensive, dedicated
project just using the Arduino chip? This is the way for
homebrewers to go! This is a preprogrammed
Atmega328P chip, useful if you want to make your own Arduino-compatible
or repair a damaged chip on an exisiting Arduino UNO, Duemilanove,
Diecimila, or NG!
This chip is programmed with 'ADAboot', the
Adafruit version of
the bootloader that is "quick-start" NG/diecimila/duemilanove/UNO-compatible.
This means that there is still a 5-second delay from when you press the
reset button to when the Arduino runs the sketch but that after you
upload a new sketch it will begin immediately. This makes the debugging
process much faster!
Only $5.95 from
http://www.adafruit.com/products/123 |
Benefits of Using the Arduino Platform
Arduino designed
for use by non-techie users
-
Artists to add lights and sound to their works
-
Musicians to add new dimensions to their instruments
-
Hobbyists building robots and R/C vehicles
-
Homeowners to make custom home automation
-
Tinkerers to make unique alarm systems
Functional modules
are simple to use
-
Microcontrollers with common architecture
-
Connections for plug-in shields for added functions
-
Simple programming language with “no-fuss” structure
-
All hardware and software compatible across variations
-
Requires only basic electronics and software skills
However overall
design is internally sophisticated
-
Based on modern ATMEL microprocessor chips
-
Common module pinouts
-
Hides complexity with clever interfaces
-
Free software to program from home computers
-
Open-source hardware and software
-
Encourages hardware variation that is compatible
-
Encourages sharing software libraries
-
Easy use of custom functions
-
Complexity hidden in easy to use libraries
Learning to use
Arduino
Get a basic Arduino
processor and beginners parts kit and reference book
-
Make magazine
-
Radio Shack
-
Adafuit
-
MicroCenter
Download free
programming software for PC, MAC or Linux
-
Get one that is compatible with the Arduino model you will use
Chose a good
beginner's tutorial and go through it step by step to learn the basics
-
Make magazine
-
Search on-line
-
Adafuit has a good YouTube video tutorial
-
Complete the entire course without skipping over anything
-
Take notes so you will remember how to do important tasks
-
Keep a notebook of programs for future reference
Before
beginning on any large tasks venture on your own build a foundation of skills
-
Start with baby steps and add complexity to gain confidence as you
learn
-
Write some software make a digital voltmeter
-
Use an analog input and display on computer thru the serial port
-
Connect a potentiometer to the analog input and Arduino dc supply
to get varying input
-
Buy a serial LCD display and learn how to output characters to it
-
Interface the voltmeter program to the LCD display
-
Learn how to use program loops to output different audio
frequencies
-
Listen to the audio with a piezo element on an Arduino output pin
-
Vary loop timing to set the frequency
-
Use the potentiometer and digital voltmeter to vary the loop
timing
-
Observe the output tone to hear the variations
-
Gain added skill and experience by following an Arduino
Experimeter's book
-
The Arduino Cookbook
-
30 Arduino Projects for the Evil Genius
Inside the
Arduino


"Shields" ...
The hardware interfaces!
If you don't want to take a "bare shield board" (shown first below on left) to
layout your own custom interface, you can chose from hundreds and hundreds of
pre-made, dedicated-function shields for sale inexpensively (~$10 to $50) by
various companies ... more than you can shake a stick at! Everything from
LCD boards, to motor controllers, touch screens, Zigby RF controllers, X10
controllers, ... this list goes on and on! Just plug these standard-sized
and standard-pinout interfaces into your Arduino board, load up the software
(which is often freely available with the shields) and you'll be off to the
races!


Click on this big image of shields (below) to get to a Google search page, then
click on your favorite project to get started!

==>
And for even more
very cool
shields from Maker Shed, visit....
http://www.makershed.com/SearchResults.asp?Search=shield
"Sketches" ...
The software programs
First ... don't be scared off by "software" ... 99% of the various projects and
shields you see around town are downloadable from the Internet and directly
usable,
with little-to-no "software" work needing to be done at all by YOU.
But if you want to customize things, or start off small and add your own
features to an existing design ... just use somebody else's code as a starting
point and start making your own incremental improvements!
More on Arduino Sketches in the Tutorial ...
http://arduino.cc/en/Tutorial/Sketch
Your Very First
Arduino Project
......
http://www.ladyada.net/learn/arduino/
"So, I get two or three emails a day, all basically asking the same
thing: "Where can I learn about electronics?" In general, most of
these people have seen some of my projects and want to be able to
build similar things. Unfortunately, I have never been able to point
them to a good site that really takes the reader through a solid
introduction to microcontrollers and basic electronics. "
I designed this tutorial course to accompany the
Arduino starter pack sold at the Adafruit webshop. The pack
contains all the components you need (minus any tools) for the
lessons
Follow these lessons for happiness and prosperity.
-
Lesson 0
Pre-flight check...Is your Arduino and computer ready?
-
Lesson 1
The "Hello World!" of electronics, a simple blinking light
-
Lesson 2
Sketches, variables, procedures and hacking code
-
Lesson 3
Breadboards, resistors and LEDs, schematics, and basic RGB
color-mixing
-
Lesson 4
The serial library and binary data - getting chatty with Arduino
and crunching numbers
-
Lesson 5
Buttons & switches, digital inputs, pull-up and pull-down
resistors, if/if-else statements, debouncing and your first
contract product design.
-
Lesson
6
LEDs in more detail, Kirchoff's Voltage Law, Ohm's Law and a
peek at the potentiometer


Notable
Projects
An Arduino based DDS-60 controller
...
http://www.theladderline.com/dds-60


Controlling an AD9851 DDS with an Arduino ...
http://blog.marxy.org/2008/05/controlling-ad9851-dds-with-arduino.html

// Control a AD9851 DDS based on the good work of others
including:
// Mike Bowthorpe, http://www.ladyada.net/rant/2007/02/cotw-ltc6903/
and
// http://www.geocities.com/leon_heller/dds.html
// This code by Peter Marks http://marxy.org
#define DDS_CLOCK 180000000
byte LOAD = 8;
byte CLOCK = 9;
byte DATA = 10;
byte LED = 13;
void setup()
{
pinMode (DATA, OUTPUT); // sets pin 10 as OUPUT
pinMode (CLOCK, OUTPUT); // sets pin 9 as OUTPUT
pinMode (LOAD, OUTPUT); // sets pin 8 as OUTPUT
pinMode (LED, OUTPUT);
}
|
void loop()
{
// Do a frequency sweep in Hz
for(unsigned long freq = 10000000; freq < 10001000; freq++)
{
sendFrequency(freq);
delay(2);
}
}
void sendFrequency(unsigned long frequency)
{
unsigned long tuning_word = (frequency * pow(2, 32)) / DDS_CLOCK;
digitalWrite (LOAD, LOW); // take load pin low
for(int i = 0; i < 32; i++)
{
if ((tuning_word & 1) == 1)
outOne();
else
outZero();
tuning_word = tuning_word >> 1;
}
byte_out(0x09);
digitalWrite (LOAD, HIGH); // Take load pin high again
} |
void byte_out(unsigned char byte)
{
int i;
for (i = 0; i < 8; i++)
{
if ((byte & 1) == 1)
outOne();
else
outZero();
byte = byte >> 1;
}
}
void outOne()
{
digitalWrite(CLOCK, LOW);
digitalWrite(DATA, HIGH);
digitalWrite(CLOCK, HIGH);
digitalWrite(DATA, LOW);
}
void outZero()
{
digitalWrite(CLOCK, LOW);
digitalWrite(DATA, LOW);
digitalWrite(CLOCK, HIGH);
}
|
Arduino + DDS 60 = RF Fun ...
http://www.hoaglun.com/blog/2012/1/15/arduino-dds-60-rf-fun.html
Using the Nano with the Marxy wiring and code (project above) ...

Arduino Uno & DDS-60 WSPR/QRSS Signal Source, by Gene Marcus, W3PM
...
http://www.knology.net/~gmarcus/


Full W3PM project file at ...
http://www.knology.net/~gmarcus/DDS_WSPR/Aruino%20Uno%20DDS-60.pdf
Arduino Scope Writer
aka "Oscilloscope Christmas Tree", by ytytyt ...
http://www.johngineer.com/blog/?p=648
Alan Wolke, W2AEW
I can't take the credit for creating this. It all
started with a scope that I sold to my friend John. One of the first things
he did with the scope was to create a Christmas Tree with the scope in XY
mode using a microcontroller. See this blog post:
http://www.johngineer.com/blog/?p=648
I simply took this code and changed the XY coordinate
data to trace out my callsign. I found that the bit of code that he has in
there to change the timing of the PWM outputs doesn't work on my Arduino
(not sure why). I also changed the RC filters on the PWM outputs to give a
good compromise for charge-time vs. achievable refresh rate, since I had a
lot more XY points than the Christmas Tree had.


View the
YouTube video of the Arduino Animated Christmas Tree!
You can download the Arduino sketch
(software) for this.
Check out the "complex" wiring diagram below :-)

REFERENCES
...
there are millions, but we show the GOOD ONES here!
-
Wikipedia ...
http://en.wikipedia.org/wiki/Arduino
-
Arduino Home Page ...
http://www.arduino.cc/
-
Arduino Software Download Page ...
http://arduino.cc/en/Main/Software
-
Arduino Tutorial by ladyada.net ...
http://www.ladyada.net/learn/arduino/
-
102 Projects from Make Magazine ...
http://makeprojects.com/c/Arduino
-
Reference Books ...
The Definitive Guide to (All) Arduino Reference Books ...
http://www.arduinobooks.com/
The Arduino Cookbook ...
http://www.amazon.com/gp/product/0596802471/ref=as_li_ss_tl?ie=UTF8&tag=ab-checkprice-20&linkCode=as2&camp=217145&creative=399369&creativeASIN=0596802471
Programming Arduino - Getting Started With Sketches
...
http://www.amazon.com/Programming-Arduino-Getting-Started-Sketches/dp/0071784225/ref=sr_1_4?ie=UTF8&qid=1358741928&sr=8-4&keywords=arduino
30 Arduino Projects for the Evile Genius ...
http://www.arduinoevilgenius.com/
-
Purchase the Arduino at ...
Adafruit Arduino Starter Pack ...
http://www.adafruit.com/products/68
Maker Shed ...
http://www.makershed.com/Arduinos_Microcontrollers_s/43.htm
Mintduino ...
http://blog.makezine.com/2013/01/18/mintduino-game-pack-learning-arduino-from-the-ground-up/
Digi-Key ...
http://www.digikey.com/product-detail/en/A000066/1050-1024-ND/2784006?WT.mc_id=PLA_2784006&gclid=CMLp77rH-LQCFQSg4Aod5icA1Q
Atmega AT328P chip with programmed-bootloader ...
http://www.adafruit.com/products/123
Back to CWTD Home

